If you want to upgrade your GPU or detect any fault that is affecting your gaming experience, then you need to learn how to safely remove a graphics card (GPU). It is also advised that if the GPU has been installed for a long time, then you should clean it so that it can function well. Also, upgrading the GPU can save power and reduce your electric bills.
To remove a graphics card – You need to uninstall the GPU drivers, shut down the PC, unplug the power cables from the power outlet, and remove the side panel from the PC. Unplug the PCI Express cables and unscrew the GPU to release it from the PCI expansion slot clips. Finally, pull out the GPU very carefully to avoid any further damage or corrosion. You must store it in an anti-static bag. You can either clean the GPU and put it back in its original place or get a new upgraded one and screw the GPU in the panel of the PC.
If you are not tech-savvy, then let’s go through the step-by-step process and help you learn how to remove a graphics card from your PC safely.
Step 1: Remove the GPU drivers
Start the computer and look for the Display Driver Uninstaller. This will help to remove any previous GPU driver stored in the PC. You need to remove the GPU drivers so that if you are replacing them, then it won’t cause any problems with the new GPU.
Get the Driver Uninstaller and follow the on-screen prompts. This will help you to remove the GPU drivers from your PC. Now, you need to restart the computer so that it can save the changes made.
Step 2: Get your workstation ready
After the PC restarts, wait for a few minutes and then shut it down. You need to prepare the workstation, where you are going to disconnect all the wires associated with the PC. Remove the wire and cable from the socket and place the PC on a table or floor. Make sure that the area is free from dust and clean. Get all the tools that you need to unscrew the panel of the PC.
Step 3: Try to avoid shorting the components
Do remember to ground yourself so that there isn’t any shorting of components. Usually, when you drag any object on the floor or table, it builds static energy, which can damage the PC. So, touch any metal object on the PC to discharge the static energy. Otherwise, you can also wear an anti-static bracelet with a ground cable attached to it. You can wrap it around your ankle or waist. This would also ensure that your body does not produce any static electricity.
Step 4: Remove the side panel of the PC
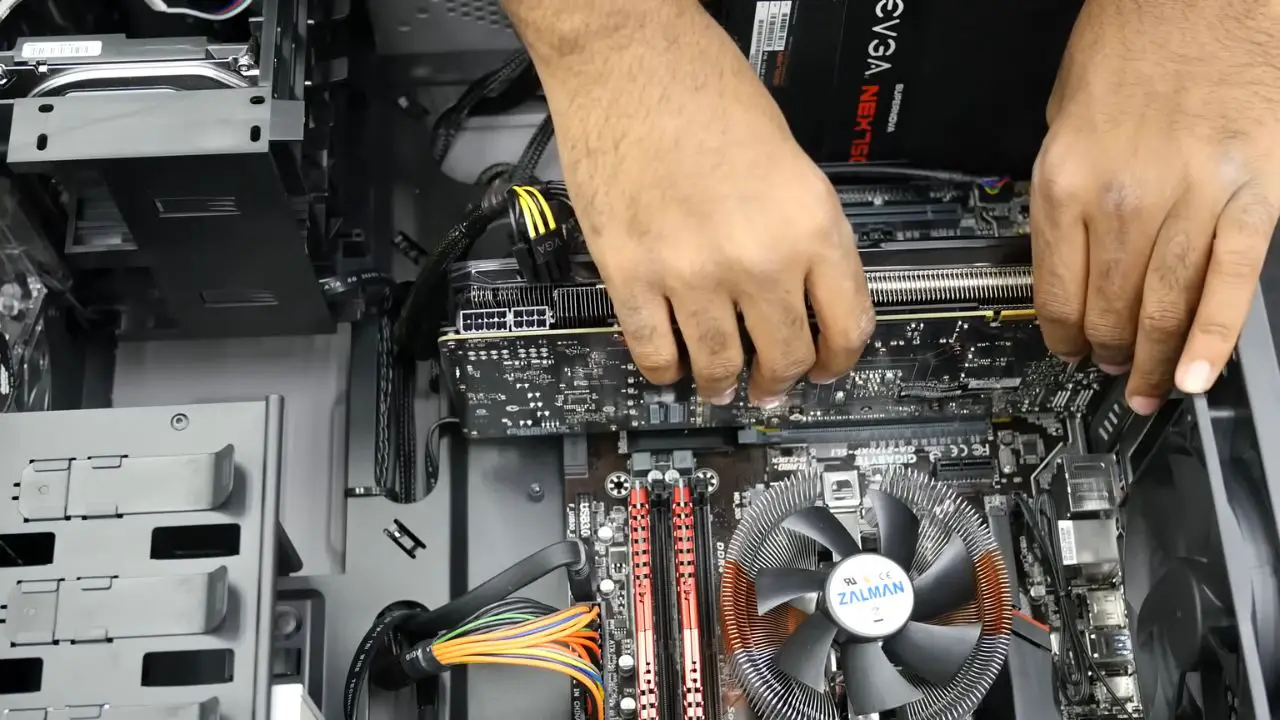
Now, unscrew the side panel and carefully set it down. This should open the internal components of the PC. Try not to lose the screw, and unscrewing can be easily done with the screwdriver. Now, look for the GPU and unplug the PCI Express cable. You can find this cable on the other side of the GPU. Remember to carefully handle the cable so that you do not cause any damage to the cables.
Step 5: Unscrew the GPU
You will find mounting screws on the GPU simply unscrew them. GPU usually has two expansion holes for its interface. Now, release the PCIe expansion slot clips. You need to undo the clips from the motherboard as well. If you find any other clips that are attached to the GPU, remove them and pull out the GPU carefully. Remember not to damage the GPU and the motherboard
Step 6: Remove the GPU
Remove the GPU from the panel. You have to pull out the GPU from the PCI expansion slot by using the cooling housing. Firmly remove the GPU and put it in an anti-static bag to avoid any kind of corrosion. Do not touch the PCB side of the GPU, as it can transfer the oil and moisture from your hand and damage it. So, this was the last step to remove the GPU from the PC without breaking it.
Can you use the PC after removing your graphics card?
The main purpose of a graphics card is to allow you to smoothly connect with your PC. It helps to send out video signals to the monitor. So, after removing the graphics card, you might not be able to run powerful games or watch high-quality graphics-demanding videos. Moreover, If you have installed any external graphics card, such as NVIDIA, then removing it will automatically lead the system to switch to the default system display drivers


