When your computer’s fans go crazy every time you open Chrome or play your favorite game, it’s an indication that they need to be controlled. Fortunately, there are applications available to assist you in getting your followers to act the way you want them to. Fan control software allows you to adjust your PC’s fans based on the temperature of your system.
We’ll go through four Windows software applications that might help you control your fan speeds in this post. Other capabilities of some of the apps include system monitoring, drive failure alarms, and even overclocking tools, to mention a few.
Check out our suggestions below if you’re searching for an application that can assist you to modify your fan settings (or even more).
What is the Significance of Fan Speed Control?
A gadget with high-end internals but inadequate cooling might as well launch with inferior hardware. When you have a low fan speed in Windows 10, you risk thermal throttling as soon as the device is loaded. Blowing hot air out of a PC helps to keep all of the internals cool, preventing it from becoming an oven for your components.
When it comes to CPU fan management, an optimal profile is very crucial, especially in laptops. Thermal throttling can further reduce clock speeds and other variables until your PC slows down. Laptops generally ship with lesser CPUs than their desktop counterparts, to begin with, and thermal throttling can further reduce clock speeds and other factors until your PC slows down.
Thankfully, most laptop manufacturers have fan speed control, and it’s almost certain that a PC fan speed controller will work. You also don’t need your blowers to be on all the time – the perfect curve will keep your device quiet while it’s not in use, but ramp up when you start doing heavy tasks like gaming.
6 Best CPU Fan Control Software Programs
1. SpeedFan
One of the earliest programs available is SpeedFan. It has a long and illustrious history, almost as long as Windows itself. Around the time Windows 9x was regarded as the cutting edge in operating systems, the first version was introduced. That’s how ancient it is.
It’s typically a good thing to have a long history. Especially for a configurable application with a simple user interface that works with all Windows versions from 9x to 10. It also features a system tray where you can set the stats you want to see. And you won’t be disappointed if you anticipate a lot of features from such a little software.
You may use SpeedFan to keep track of not just the speed of your fans, but also their voltages and temperatures. That isn’t all, though. You can check the hard disc temperature and alter fan speed at will thanks to its ability to access both digital temperature sensors and S.M.A.R.T. information.
This program is really simple to set up. You’ll have to manually set the fan speed restrictions to get it to function properly. Simply keep your ear tuned to the exact fan you’re trying to target with the program and set the speed to the point where you can hardly hear it. SpeedFan can also be used to set temperature maximums.
How to Control a Windows Fan with a Speed Fan?
The first step is to download and install SpeedFan to check fan speed. We won’t insult your brain by guiding you through the installation wizard, but here’s a link to a download page in case you need it.
- Check fan speed and open configuration
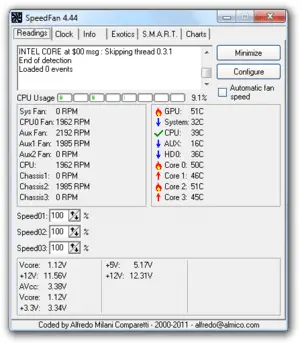
When you first start Speed Fan, you’ll be inundated with information. The fans’ revolutions per minute, or RPM, are displayed on the left, while the temperature of your core components is displayed on the right. Before we begin, you should test this both at rest and under stress. A tick indicates that your gear is operating at normal temperatures, a down-arrow indicates that it is cold, and a flame indicates that it is too hot. The maximum rated temperature varies based on the hardware, but if it exceeds 85°C, you should be very worried.
After you’ve jotted down this information, click “Configure.”
- Select your chip
Select the data that start with “IT” and ends with “ISA” from the up-down next to “Chip” on the “Advanced” tab.
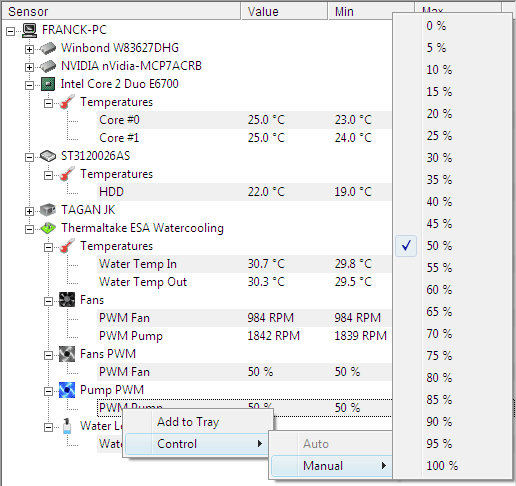
- Find your PWM settings
Your PC may not enable fan control if you don’t have an IT-ISA entry, but you may click each chip and search for switches labeled “PWM 1 mode,” or “PWM 2 mode,” which shows the various fan controllers. There is no fan attached where it says “NO.” Active fans generally display the value “SmartGuardian,” which indicates chip-based control.
- PWM should be set to software controlled.
Change the “SmartGuardian” to “Software controlled” on each of the PWM entries to allow SpeedFan to take control.
- Make it a habit.
You may select the “remember it” box if you want these changes to last. We don’t suggest doing this unless you’re satisfied with your fan profile. “OK” should be pressed.
- Check the fan’s speed.
There’s a good probability that one piece of hardware, usually the CPU or GPU, is performing worse than the others. You can determine which PWM controls the fan for each component by setting their settings to 0 and seeing which component experiences a temperature increase. Make a note of this and return them to their former values thereafter. The fans may then be turned down to make them quiet while keeping the temperatures at a comfortable level for a short online browsing profile.
- Set the fan speed to automatic or customize it.
You can use SpeedFan to get more complicated fan speeds. If you want it to do the heavy lifting for you, choose “Automatic fan speed,” or customize if you don’t like its choices.
- Set a minimum and maximum value for PWM.
You may specify minimum and maximum percentages for each fan in the configure window’s “Speeds” tab. By checking the box next to “Automatically variated,” SpeedFan will maintain some automated fan speed control while ensuring that it does not go beyond or below certain settings. Before making any changes, you should be aware of the temperatures of each hardware component.
2. EasyTune 5
You get more than simply a tool to monitor and adjust the speeds of your fans with EasyTune 5. You’ll also find a slew of additional handy capabilities in the application that you probably didn’t realize you needed.

The Smart-Fan control is the EasyTune 5 function that we’re most concerned about. This function allows you to adjust the fan on your CPU cooler directly. You may easily set up this functionality using Easy Mode.
You get more than simply a tool to monitor and adjust the speeds of your fans with EasyTune 5. You’ll also find a slew of additional handy capabilities in the application that you probably didn’t realize you needed.
The Smart-Fan control is the EasyTune 5 function that we’re most concerned about. This function allows you to adjust the fan on your CPU cooler directly. You may easily set up this functionality using Easy Mode.
We think the following are some of its greatest features:
- It provides overlocking to improve the performance of your system.
- You’ll get an M.I.A and C.I.B utility to greatly improve the memory and CPU performance of your machine.
- This program includes clever fan control as well as speed management features. It also includes a North Bridge chipset with a cooling fan.
- It features a PC health function that allows you to keep track of your system’s health.
- You may choose between simple and advanced modes and switch between them
- You can change the PC system to a bus clock using the easy mode.
- All of the overlocking functions, such as M.I.B and C.I.A, are available in advanced mode.
3. Argus Monitor
Argus Monitor is probably the best choice if you’re searching for a lightweight fan control application. It uses little RAM and provides you complete control over the speed of your fans, as well as monitoring the temperature and health of your CPU, hard drives, and SSDs.

It appears to be a more of capability for an application that operates in the background. But it’s just this that distinguishes Argus. This program also shows and adjusts the fan speed of current NVIDIA and AMD graphics cards. For gamers, this is an especially helpful tool.
Argus Monitor can also help you spot early warning signals that your hard drive or SSD is about to fail. The software informs you that your hard disc is failing (with a 70% accuracy rate). This allows you plenty of time to replace the drive and transfer all of your essential information from the old one.
This application contains all the functionality you need to operate your PC efficiently and has an easy-to-configure interface. The only disadvantage is that you can only try it for 30 days for free. You’ll need to buy a license if you want to keep using it for 30 days.
We think the following are some of its greatest features:
- M.A.R.T characteristics may be used to monitor the temperature and health of your hard drive.
- Even before the hard disc dies, this software warns you with a 70% likelihood. As a result, you will be able to preserve all of your critical data on time.
- The software shows you a graphical depiction of your hard drive’s temperature.
- It comes with temperature monitoring for the CPU and GPU.
- You may see a visual depiction of core frequency here. You may verify the effectiveness of the power management system there.
- Estimating transfer speeds and access time is easier with the SDD and HDD marks.
4. HWMonitor
Another application that has been around for a long time is HWMonitor. And in that time, it has distinguished itself and built a user base that continues to expand. HWMonitor performs all of the functions of the other applications, plus more.
It monitors your system’s primary sensors after it’s been installed. Voltages, temps, and fan speeds are all included. It also scans the S.M.A.R.T. critical information on your hard drive and keeps an eye on your video card.
The software gives you a simple method to regulate your system’s fans (including the fan on your CPU cooler). This utility also logs the motherboard and CPU voltages, as well as the total system’s power consumption in watts, if you wish to keep track of your PC’s power usage.
The user interface of HWMonitor, on the other hand, is a little clumsy. It may take some time for you to become comfortable with the numbers in the columns in front of you. However, once you’ve mastered it, you’ll never want to use another app again.
5. Zotac FIRESTORM
Another useful application is Zotac which can be used as a fan speed controller and overclocking tool. Zotac has a long history in the gaming business, having sold both gaming PCs and graphics cards.

The simplicity and ease of use of FIRESTORM’s interface is maybe its most notable feature. You may use FIRESTORM to overclock your GPU, create custom fan curves, modify the RGB lighting on your graphics card, and monitor its performance.
It’s worth noting, though, that FIRESTORM does not allow you to regulate your CPU fan. You will only be able to manage your graphics card and its fans using it.
While there are many CPU temperature monitors and other hardware monitoring programs to choose from, there aren’t nearly as many options for fan control software. The four choices described above, on the other hand, will help you get better control over your system’s fans, allowing you to minimize noise and enhance temperatures.
To keep your system secure from problems, make sure you operate it correctly. CPU fans are quite useful in keeping your computer safe from overheating. However, excellent fan control software is required to get the most out of a CPU.