You’re now prepared to sell or scrap your outdated computer parts. However, there is one prerequisite – you must wipe your computer’s hard drive. This includes deleting any personal and financial information stored on your computer.
But Simply deleting a file does not ensure that it is permanently deleted; you must completely wipe your hard disc. Learn how to thoroughly clean a computer and how to erase a hard drive in this article. Learn how to securely erase a hard disc on Windows 10 and 11 to safeguard your sensitive information. Then, learn how to maintain a clean PC with specific tuneup software.
First And Most Important Thing: Backup
Assure that your data is backed up as part of a 3-2-1 backup strategy, in which three copies of your data are stored on two different types of media, one of which is off-site. Your initial copy is on your PC. Your second copy can be stored on an external hard drive or other removable storage devices. And a third copy should be stored in cloud storage. If you are not currently backing up your data to an off-site location, now is an excellent moment to begin.
To make a local backup on an external hard drive, you can use the basic tools in Windows 7, 8, 8.1, 10, and 11. You can use this to move your files between computers or keep them safe in case you lose them. Once you’ve backed up your data, you’re ready to erase the hard disc of your PC.
When should you completely wipe a hard drive?
- When selling, exchanging or discarding a computer
Always wipe your hard disc before disposing of a computer, whether it’s the internal drive or an external USB drive. This guarantees that any personal data on the disc is unrecoverable if another user attempts to do so.
- When it comes to getting rid of damaged drives
While damaged hard drives may be unusable, they are not entirely useless. Someone may still retrieve the data from them and sell it on the dark web, use it to perpetrate identity theft, or guess your passwords.
Though SSDs with TRIM enabled will automatically erase deleted information, you should execute a wipe to ensure your hard drive is completely clear.
- When upgrading from HDD to SDD
After moving your data from a hard disc drive (HDD) to a solid-state drive (SDD), erase your old hard drive if you want to give it away or dispose of it. Additionally, you may purchase a case for your old drive and use it as an external storage device.
- In the case of a fresh start
While completely erasing a hard drive and starting over is a severe measure, it is also an efficient technique to return an outdated hard drive — or PC — to peak performance. Wiping your drive can assist in resolving 100% disc utilization on Windows and removing any bloatware that has accumulated accidentally.
How to Completely Wipe a PC?
The first thing you need to do is figure out whether your computer has a hard disc drive (HDD) or a solid-state drive (SSD) (SSD). Although the majority of PCs and laptops released in the previous several years will contain an SSD, you may simply verify this:
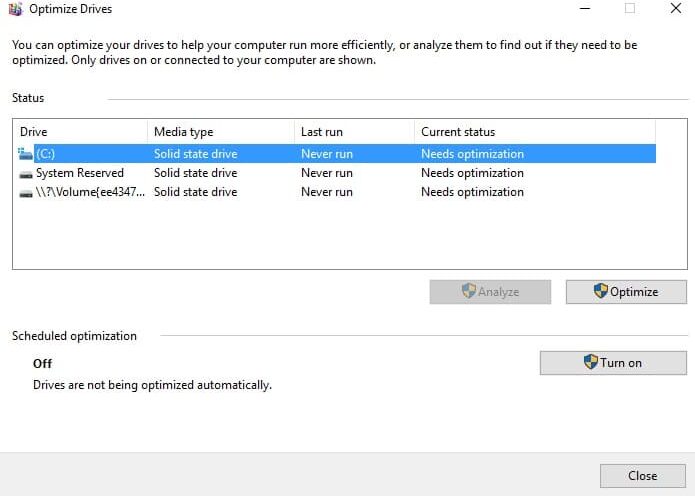
- Open Settings.
- Type “Defragment” in the search bar.
- Click on “Defragment and Optimize Your Drives”
- Check the media type of your drive.
Types of data deletion
It doesn’t matter what kind of data you had on your computer before you decided to give it away or recycle it. It’s better to be safe than sorry.
It doesn’t mean that when you delete your files from the recycle bin or trash can, they’re gone from your computer. It only means that its place is available. Data recovery software can quickly find those files that have been hidden in your hard drive for a long time.
Here are a few ways to wipe your hard drive like the pros and make sure that no one can get to your old files.
DBAN
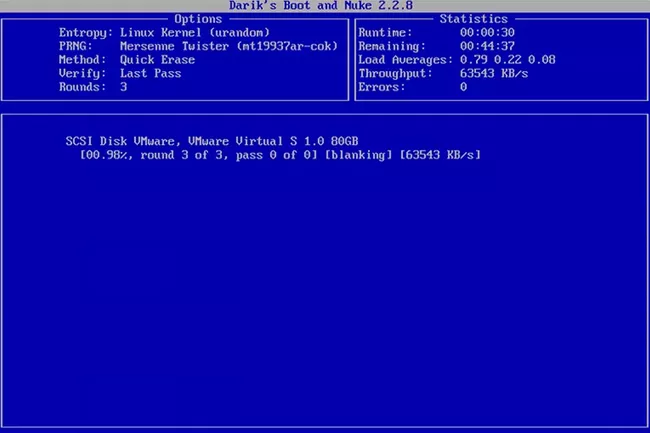
DBAN, an acronym for Darik’s Boot and Nuke, employs a random number generator to repeatedly overwrite and destroy the contents of the hard drive. There is now a new number for every file that has been deleted and now it has that number. In this case, it is not possible for data recovery tools to get to it. If you want to sell, donate, or recycle your computer or laptop, this tool can help you figure out how much money you can get.
Destroy the drive
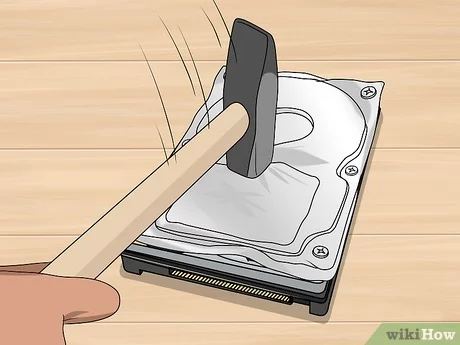
Damage the hard drive in a way that makes it impossible for anyone else to get it. With a screwdriver, you can take apart the parts of the hard drive. Then, with the help of a hammer, you can scratch and break the disc. When the disc is put into another hard drive, it should not work. Also, a powerful rare earth magnet can be used to break the platter in a hard drive.
How to Erase The Drive Containing Windows?
Once you’ve determined the type of disc you have, you have two options for wiping your PC:
1. Reset: Wiping a computer is typically as simple as reformatting the drive and reinstalling Windows through the Reset option. If you’re simply discarding, giving, or selling your computer, the Reset feature makes it prohibitively impossible for someone to recover your data, even more so if it’s encrypted. This is a simple process with Windows 8, 8.1, 10, and 11 for either a hard drive or an SSD.
2. Using Third-Party Tools to Perform a Secure Erase: If Reset does not entirely reassure you that your data cannot be restored, or if you have a PC running Windows 7 or an earlier version of Windows, you have another choice. There are several excellent third-party programs available for safely erasing your drive, which we’ll discuss below. These vary based on whether you have a hard disc drive or an SSD.
How to Wipe a Windows 10 and 11 Hard Drive?
- Go to Settings > System (Update & Security in Windows 10) > Recovery.
- Under “Reset this PC” click the “Reset” option. (Click “Get Started” in Windows 10.)
- Choose “Remove everything” (If you do not want to fully erase your PC, you can choose “Keep my files”)
- You will be asked to choose the option to reinstall Windows via “Cloud download” or “Local reinstall” Cloud download option will use internet data. If you’re planning to recycle your PC, “Local reinstall” works just fine.
- In “Additional settings” click “Change settings” and toggle “Clean data” to on. This takes longer, but it’s the most secure option.
- Click “Reset” to start the process.
How to Wipe a Windows 8 and 8.1 Hard Drive?
- Go to Settings > Change PC Settings > Update and Recovery > Recovery.
- Under “Remove everything and reinstall Windows” click “Get started” then click “Next”.
- Select “Fully clean the drive” This takes longer, but it’s the most secure option.
- Click “Reset” to start the process.
Secure Erase Using Third-party Tools
If your PC is running an earlier version of Windows or you just want greater control over the erasure process, there are a variety of open-source third-party applications available to erase your PC’s hard drive, depending on whether it is a hard disc drive or a solid-state drive.
Secure Erase an HDD
Getting rid of data on a hard drive is done by overwriting it. There are a lot of programs out there that can help you do it:
DBAN: Abbreviation for Darik’s Boot and Nuke, DBAN has been around for years and is a well-known and reliable drive wipe application for hard disc drives (HDDs). It rewrites the disc with binary ones and zeros (a lot of them) a lot of times. When you download it, you’ll need to put it on a USB drive and run it from there.
Disk Wipe: Another free program, Disk Wipe does numerous binary data rewrites. If you want to overwrite your disc, you can choose from several different ways to do it. If you don’t want to install Disk Wipe, you don’t have to. You can use it right away.
Eraser: Eraser is also a completely free application. When you use this, you can have the most control over how you erase your disc As with Disk Wipe, you can choose from a variety of different methods that include different numbers of rewrites, or you can make up your method that fits your needs.
You should keep in mind that any disc cleaning utility that does multiple rewrites is going to take a very long time to finish.
If you’re running Windows 7 or an earlier version of the operating system and just want to recycle your computer, you may stop here. If you’re selling or donating your computer, you’ll need the original installation discs.
Secure Erase an SSD
When wiping data from a solid-state drive (SSD), you may wish to encrypt the data to ensure it cannot be retrieved. Why? The storage and retrieval methods of SSDs and HDDs are different.
HDDs store data in a specific position on the platter of the drive. Storage devices such as solid-state drives (SSDs) use electrical circuits and individual memory cells to store data. Rewriting to the same blocks repeatedly wears down the disc. SSDs employ “wear levelling” to write over the entire drive, which means that your data is not kept in one physical location—spread it’s out throughout the whole drive.
When you instruct an SSD to delete your data, it does not overwrite it, but instead creates a new block of data. What this means is that even after you tell your SSD to be deleted, part of your data may remain on your SSD until wear levelling deems that the cells in that block may be rewritten. As a result, before wiping data from an SSD, be sure to encrypt it first. In this method, no one will be able to access any information that is still hiding unless they have the encryption key.
Even though you don’t have to encrypt your data before Windows Reset, we think it would be a good idea if you’ve made it this far. Encrypting your data is a smart idea even if you’re not planning on getting rid of your computer or hard drive. Even if you lose your laptop, encryption makes it more difficult for thieves to get their hands on any of your sensitive information.
The process of encrypting your data is rather simple, but not all Windows computers are created equal. A good place to start is to discover if your device is already encrypted.
- Navigate to the Start menu.
- Scroll down to the drop-down menu labelled “Windows Administrative Tools“.
- “System Information” should be selected. Additionally, you may perform a taskbar search for “system information.”
- If the “Device Encryption Support” response is “Meets prerequisites“, your device is ready to go—encryption is enabled.
If not, the next step is to determine whether your device includes BitLocker:
- Open Settings.
- Type “BitLocker” in the search bar.
- Click “Manage BitLocker”.
- Click “Turn on BitLocker” and follow the prompts.
If neither of those methods is available, you can encrypt your internal SSD using third-party software. Both VeraCrypt and AxCrypt are viable solutions. Simply keep a note of the encryption passcode, as well as the operating system, operating system version, and encryption programme used, so that you may retrieve the information later if necessary.
After encrypting your data, the next step is to delete it, and you have several options:
Parted Magic: Parted Magic is the most frequently suggested third-party SSD wipe tool, however it does cost $11. It’s a bootable utility, similar to various HDD wipe utilities; you must download it to a USB stick and execute it from there.
ATA Secure Erase: ATA Secure Erase is a command that shocks your SSD to death. It flushes stored electrons with a voltage shock. While this may seem harmful (and it does result in some wear), it is completely harmless. Because it does not wipe the data like other safe erase programmes do, it actually does less damage to the SSD.
FAQ
Can I wipe a hard drive without deleting Windows?
While it is not possible to completely wipe the hard disc without also destroying the operating system, resetting Windows to its factory default settings would delete all personal data and apps on the machine.
How do I reinstall Windows on the wiped hard drive?
To reinstall Windows, insert a Windows DVD or a USB drive with the Windows ISO image, reboot the computer, and follow the directions during the installation process.
How do I wipe an external hard drive?
Connect the drive to your computer, and choose the external drive in This PC. Select the Format option from the context menu, then select a file system and follow the steps.
How do I reinstall macOS on a wiped Mac hard drive?
Open the Mac OS utility app and click Install macOS. Then follow the steps.